


Dimensioned PCB Drawings for Assemblers


In my previous article, Generating Outputs for Assemblers, we generated a fantastic assembly drawing for an assembler or contract manufacturer to visually determine component placement positions. However, there are times you may wish to provide drawings that impart additional clarity to your assembler in order to ease the setup of machines or other processes—this typically involves panelization dimensions or fiducial positions on the panel. In the last article, we did not provide any dimensions to the assembler or any panel view, as the panel for that project was quite simple.
If you have a complex panel involving many boards, it can be helpful to provide dimensions to the origin of each board within the panel. When assemblers work with board specific pick and place files rather than a full panel’s pick and place files, it can help them considerably to have the offsets from the panel origin for each board. Some assembly machines don’t like having duplicates of each designator, making a single panel pick and place files not viable. Likewise, if you have multiple designs, the assembly machine may not handle having multiple identical designators (e.g., R1 or C1) with different values well. This limitation may not be purely for the machine’s software, but to reduce the chance of operator error too. Therefore, if you have a single file with multiple R1s where, say, four are the same value and one is different, it wouldn’t be a difficult mistake to group them all together for the machine to place the same value all at once.
A multi-PCB panel that makes sense from a low volume production design standpoint but isn’t very friendly to a PCB assembler.
This panel is fairly non-standard, with 4 different designs on it, two of which have multiple copies that are not in a nice array. This panel isn’t very friendly to an assembler, and may take a lot of extra setup work compared to one with all the parts in a nice array or on multiple panels. All of these boards are used on a single low volume product, so it makes sense to manufacture one panel per unit rather than multiple panels containing an array of boards.
As a note on the panel above, there are multiple areas that are not following good design for assembly practices. For example, many of the boards are held into the panel with mouse nibble tabs. This could cause the boards to flex or bounce under the placement force of the assembly machine, or even break the individual boards off in the machine. This is where experience and working closely with your assembler on a design can allow you to deviate from industry best practice without affecting your production success rates.
Dimensioning a Panel
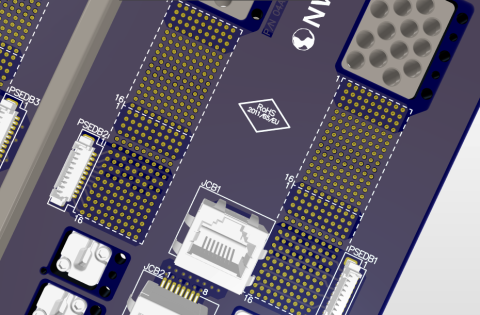
I have setup the panel pictured earlier in a draftsman document that is set up the same as in the previous article, with the addition of SMT and PTH pads visible. Usually, for an assembly drawing, pads being visible can make it more difficult to read component designators. However, for this specific assembly drawing, we don’t need the designators to be legible, as each board should have it’s own individual assembly drawing which makes everything perfectly clear.
A draftsman document set up as described in the Generating Outputs for Assemblers article, but has SMT pads visible.
There are several types of dimensions available within draftsman, which you can access either from the right click -> Place menu, from the Place menu on the top toolbar (which you can do by pressing the P key on your keyboard), or from the Active Bar at the top of the editor.
Pressing P on your keyboard will bring up the Place menu at your mouse pointer.
Holding your left mouse button down on the linear dimension button will bring down a menu with all of the dimension types.
Ordinate dimensions from the bottom left panel corner allow for easier assembly and less confusion.
Using the Ordinate Dimension, you can quickly add dimensions from an origin point to your assembly drawing. This is an easy way to reference the location of each board on the panel. To use this dimension tool, click on one edge of your circuit board, and then click on a corner of each point you want to add a reference to. Press escape or right click when you are finished adding dimensions. The successive dimensions will not to reference a line, just a vertex/corner, so I have found that adding dimensions to corners is the fastest way to go.
Try to keep dimension lines short, without spanning across your whole panel. In this example, there are boards within the panel that should be defined from all sides, using the bottom right corner of the panel as the origin point. This keeps the measurements as visible as possible.
The draftsman document after the dimensioning was complete. Notice how all dimensions start from either the bottom edge or the left edge.
It may be worth noting to your assembler that these measurements are absolute with respect to the origin, not individual. The arrow style denotes this, however, many mechanical drawings with sequential measurements displayed in this fashion would consider each successive number to be the distance from the last measurement.
If you have an array of boards (multiple rows and/or columns), you can dimension from the first board to the second board and set the dimension suffix to ‘ TYP.’ (for Typical - not the leading trace)=. This denotes that all successive copies match this measurement unless otherwise stated.
TYP. dimensions allow you to quickly describe to the assembler that this dimension repeats across all boards on the axis.
You can do the same for your corner mounting holes in the panel as well, dimensioning a single hole with Ø 3.0 TYP. for example. Use a Diametral Dimension for dimensioning holes.
The right way to put dimensions on mounting holes is through diametral dimensioning.
Furthermore, you can use annotations to call out the name and rotations of each board. This is especially useful if you have multiple copies of a board in different orientations on the panel.
Board names and orientations help the assemblers a lot. The more detail you add, the easier time the assembler has, and therefore the faster your assembly process will be completed.
Data For Assemblers
When you submit your documents and outputs to an assembler or contract manufacturer, it’s vital to make sure you provide as much clarity as possible. If your production run is small or in prototype volume, this becomes especially true as the chances of manual labor being involved in the placement and inspection process is much greater than that of a large assembly run for which it is worth the time to program multiple machines and set up automated optical inspection. By providing as much clarity as possible to an assembler, you can save on your lead time by not having the assembler stop their process to contact you, as well as reduce errors from an assembler working off a faulty assumption based on incomplete or unclear data.
Spending an extra hour using the amazing tools that Altium Designer® provides to document your project and transfer knowledge to your manufacturing partners can save you days or even weeks of delays on a project.
Find out more about PCB data management and the great paradigm shift or if you have more questions call an expert at Altium.
关于作者
相关资源
从设计到发布,全程无阻碍
- 让评审始终关联到正确的版本
- 减少交接中的混乱和返工
- 更早发现采购与发布风险
- 可独立工作,按需共享
开始使用
Thank you, you are now subscribed to updates.


 沪公网安备 31010502006411号